Projects merging tool
The BlueCielo Projects Merging Tool was created to help BlueCielo Professional Services consultants and BlueCielo Partners to merge multiple customer vaults into a single vault. This tool is a supplement to the Vault merging tool and should be used after the vaults have been merged if any of the source vaults also contain project folders. This tool provides mapping options for folder types, custom folder properties, project definitions, and workflow states. No documents are processed by this tool.
The tool supports 32-bit and 64-bit CPUs. The current version is 9.6.3011.
Description
To obtain the Projects Merging Tool:
-
Download the archive file below with your favorite secure FTP program, for example, FileZilla.
To install the Projects Merging Tool:
- Extract the contents of the archive file to a location on your PC.
To start a new merge operation:
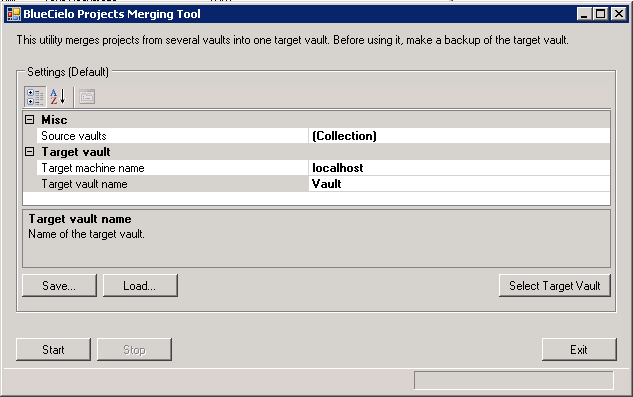
- Start ProjectsMerge.exe. The main window of the program appears as shown in the following picture.
- To start with an existing settings file:
- Click Load and select the .prjmrg file.
Tip If you have previously ran the Vault merging tool and want to now merge the projects from the same source vaults to the same destination vault, copy the .vltmrg settings file to a new file with the .prjmrg extension and load that file. All of the settings that are common to both tools can be reused or modified to meet different requirements. Extra settings will be ignored.
OR
If you do not want to start with an existing settings file:
- In the Source vaults row, click the collection button
 to select the source vaults that contain the projects that you want to merge. The Source vault settings dialog box appears similar to the following picture. If the tool has not been used before, the Members and properties lists will be empty.
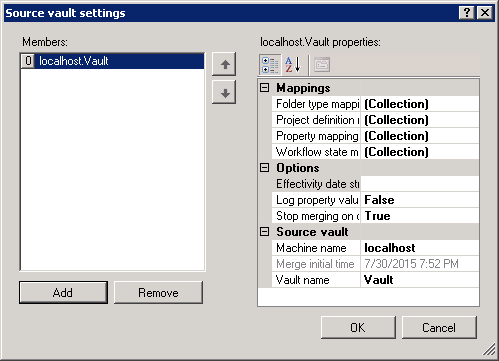
- Click Add to specify the first vault. An example source vault is added to Members.
- Type the name of the source vault that you want to merge in Vault name.
-
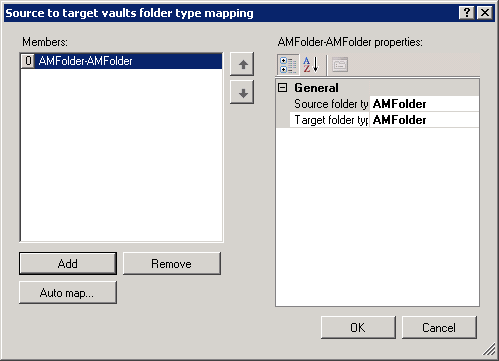
For each of the Mappings options, click the collection button
to specify the mappings of the source vault items to the destination vault items. A mapping dialog box appears similar to the following picture. If the item types have not yet been mapped, the Members and mapping lists will be empty.Notes
- Only those items (folder types, project definitions, properties, and workflow states) with mappings will be merged into the destination vault. All other items will be skipped.
- The folder type mappings and project definition mappings should be the same for both the vault merge and project merge tools.
-
To automatically map all of the source vault items to identically named items in the destination vault, click Auto map. The Members list is filled with the source vault items. Options for each mapping appear at the right depending on the item type.
OR
To create individual mappings, click Add. A single example mapping is added to the Members list. Options for the mapping appear at the right depending on the item type.
OR
For property mappings only, to load the mappings from an Access database, click Load from DB. The Open dialog box appears, with which you can select the Access database. The database tables must have a specific structure. An example database is provided with the tool. The Microsoft.ACE.OLEDB.12.0 provider must be installed on the PC.
- Confirm or correct the options for each option of each mapping. For property mappings, you can specify the following options.
| Option | Description |
| Default target property value | A single value to set for this property in every folder in the destination vault if the property in the source vault is empty or null. |
| Property value mapping |
Mappings of source property values to destination property values. If a matching property value is not found, the source value is set in the destination vault. Note The property mappings should include both folder and project properties. |
- When you are finished configuring the options for all mappings of an item type, click OK to save your changes and return to the Source vault settings dialog box.
- Repeat steps 3 to 8 for each source vault that you want to merge.
- When you are finished mapping all of the source vaults, click OK to save your changes and return to the main window.
- Click Select Target Vault to choose an existing vault to be the destination. The Open Vault dialog box appears. Select the vault that you want to receive the source vault items and then click OK.
- In the Options group, confirm or correct the settings of the following options:
| Option | Description |
| Effectivity date string format | The format in which to set date/time values in the destination vault that are mapped to the virtual source vault properties EffectivityFrom and EffectivityTo. If mapped, these properties contain the effectivity dates/times of the specific revisions of a document. If this option is empty, the properties are assumed to have data types of DateTime. The supported format strings are described in the .NET Framework DateTimeFormatInfo Class topic in the MSDN library. |
| Log property values | Includes property values in the process log file for troubleshooting. This can greatly expand the size of the log file. The default is False. |
| Stop merging on committing errors | Stops a merge operation if any errors occur. The default is True. If set to False and the special virtual source vault property StatusMessage is mapped to a destination (string) property, it will contain information about merge errors. |
- If you want to save your settings as a backup or to reuse later, click Save. The Save merge settings dialog box appears. The default name of the settings file is <MachineName>~<VaultName>.prjmrg. Accept the default filename or correct the name and click Save.
-
To start the merge process, click Start. The progress bar in the status strip shows the progress of the merge.
If you must stop the operation, click Stop.
A message box appears when the process has completed. A log file of all actions that were performed during the operation can be found in the program folder with the name Log-<Date>.log. Subsequent runs of the program on the same day append a number to the file extension. The maximum size of each log file is 1 GB, after which a new log file will be started.
Notes
- Unlike the vault merge tool, this tool does not support partial sessions and resuming a previous session. It should run to completion.
-
This tool will attempt to synchronize the project workflow states between vaults and the workflow states of documents might be indirectly used in interlock conditions. Interlocks may become a problem in the first transitions (when using the vault merge tool) and at the final transitions (when using the projects merge tool), so it may be useful to remove interlocks temporarily in the destination vault before running the vault merge tool and restore them again after using the projects merge tool.
-
Because this tool attempts to execute transitions on projects, the configuration of the destination vault may prevent their execution. Please keep this in mind and temporarily remove the security rules and interlocks that may block the transitions, especially transitions to the workflow end state.